DISCLOSURE: I am not a mental health professional. If you need help finding a mental health care provider, call 1-800-662-HELP (4357) or visit Online Therapy to call, message, or video chat a certified therapist online. This post contains affiliate links. As an Amazon Associate, I earn from qualifying purchases. I may also receive compensation from Online Therapy or other sources if you purchase products or services through the links provided on this page. You can read my full disclaimer.
I started my blog back in 2015 for no other reason than something inside me was burning for a better life. I was stuck in my full-time retail job, battling severe anxiety and depression, and going through so many changes throughout my personal life.
Deep down, I knew I deserved a better life. But I didn’t know exactly how. What started as an outlet for me was actually the beginning of a journey that would completely change my life.
I have no idea where I would be without blogging. I’ve connected with so many amazing people, especially in the mental health community. I’ve grown so much as a person because of it.
However, one of the greatest perks of having a blog is that I get paid to do what I love. I get to work from home, make my own schedule, and be my own boss.
Some reasons to start a blog:
- Express your thoughts and opinions
- Help others
- Connect with people like you
- Have a creative outlet
- Make a difference
- Make money with your passion
If that sounds like something you’re interested, keep on reading for my step-by-step tutorial to creating your own profitable mental health blog.
HOW TO CREATE A PROFITABLE MENTAL HEALTH BLOG
Now, you might be asking, “How do you get paid to blog?” For starters, you’re going to want to be self-hosted, meaning you own your domain. Like so many other bloggers, I highly recommend using Bluehost for your hosting needs.
You now might be thinking, “Can’t I just start my blog for free and just change over later when I’m making money?” Nope. Not really.
Making money on any free blogging platform, such as Weebly, Wix, and Blogger, is very difficult. In many cases, it never happens.
This is because having your site be yourwebsite.blogspot.com is way more cluttered and hard to remember than yourwebsite.com. In fact, most advertisers and companies tend to steer clear from these websites, because they don’t seem as professional as self-hosted WordPress blogs.
With Bluehost, you can run ads, affiliate links, and sponsored posts that will allow you to earn money. There are so many other reasons I believe Bluehost to be one of the best web hosting providers out there.
These reasons include:
- I personally use Bluehost. If I didn’t, I certainly wouldn’t recommend it to you!
- They power over two million websites worldwide
- You will be self-hosted, which means you’ll be able to monetize your blog.
- You will appear much more professional to companies and readers.
- Bluehost makes it incredibly easy to create your own WordPress blog.
- Bluehost is extremely affordable. For just dollars a month, you can own your very own website.
- You will get a blog domain with a 12 month plan for FREE.
- They offer 24/7 technical support.
- Bluehost offers a 30 day money back guarantee if you’re not completely satisfied.
Without further ado, let’s continue to the part you’ve been waiting for: the step-by-step tutorial.
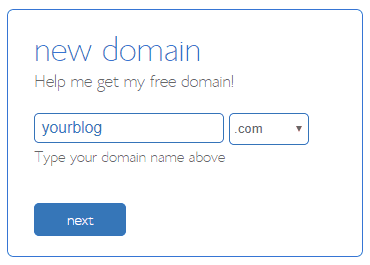
1. CHOOSE YOUR DOMAIN NAME
When you are ready to create your blog, click the green “Get Started Now” button.
The very first thing you will need to do when starting a WordPress Mental Health blog on Bluehost is to think about what you want your blog to be called. This will be your domain name.

For example, my domain is okaynowbreathe.com. I gave some really serious thought to my name. Almost 3 years later and I’m still so happy with it. I feel like it represents my brand so well.
Tips to find your domain name:
- Search what’s already taken
- Make it easy to type
- Keep it short
- Target your niche
- Avoid numbers and hyphens
- Be memorable
You can get your domain directly through Bluehost, which is awesome because this makes the process really easy to do!
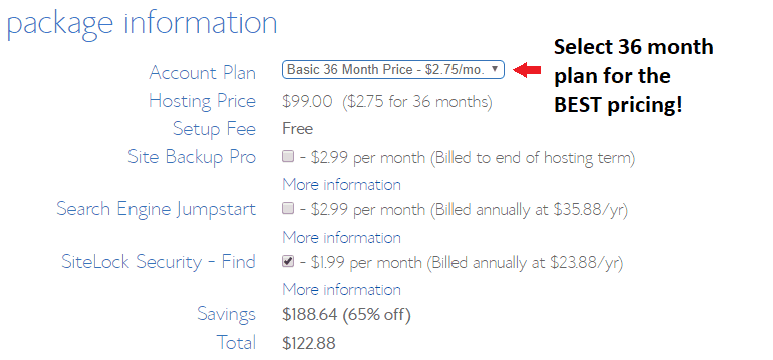
If you decide to do this, you can get your domain completely FREE for the first year, as long as you buy 12 months worth of Bluehost web hosting. If you want an even better deal, the best value would be purchasing a 36 month plan, because your monthly rate is much lower.
2. BUY HOSTING FOR YOUR BLOG
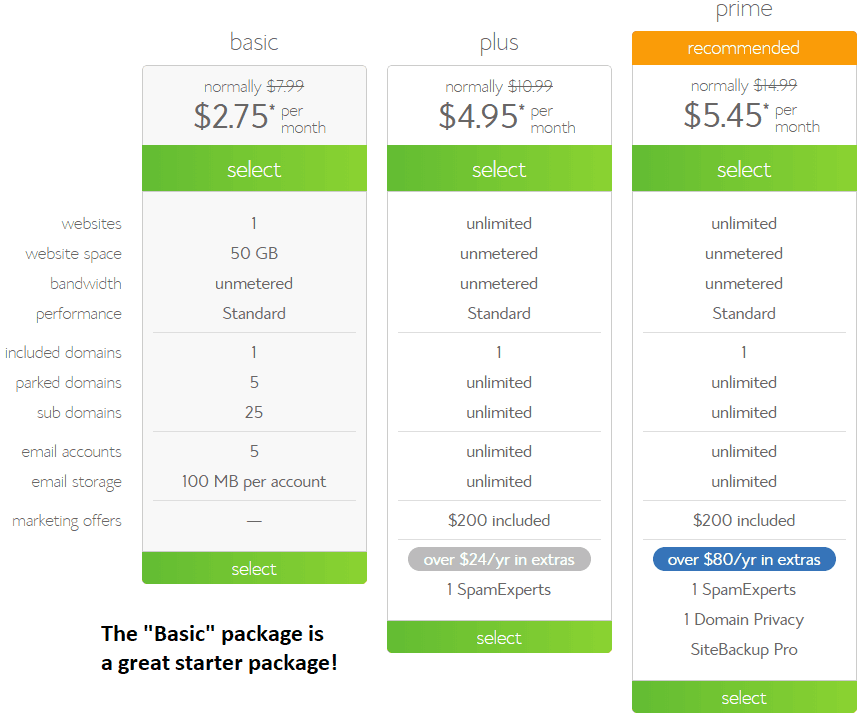
Once you decide on your domain name, click on the package you’re interested in. The basic package is a great starter package, so you can skip the Plus and Prime plans. You can always upgrade your package later if you want to.
It’s important to note that Bluehost requires you to pay in full at the time of purchase. Still, if you break down the cost, it is incredibly affordable.

Like I said before, the best value would be signing up for the 36 month plan, because your monthly rate is much lower over the long run. If that’s too big of a commitment, you can certainly select a lower option. Remember that you’ll only get your free domain if you commit to at least a 12 month plan.
After you select your package, you’ll be asked to enter your personal and payment information. Then it’s time to create a secure password.
3. INSTALL WORDPRESS ON BLUEHOST
Once you login to your Bluehost account, all it takes is a few clicks and WordPress will automatically be installed into your account.
To sign into your WordPress account, you will want to save the WordPress login information that you’ll receive in a separate email. This email includes your WordPress login URL, your username, and your password.
Your URL is separate from everyone else’s. It’s the Admin page and the only way you’ll be able to access your account.
Now the fun part of blogging begins!
4. CHOOSE YOUR THEME
Bluehost will ask you to pick a theme. (On the left hand side of your dashboard, Appearance > Themes) You can purchase one, but I recommend starting out with a free one. You can always upgrade and change your theme at any time!
A great starter theme I recommend is Pure & Simple. It’s actually the one I’ve been using for years. It’s highly customizable, and you can easily pick your color scheme.
5. INSTALL PLUGINS
Plugins are third-party devices that add additional functionality to your blog. (On the left hand side of your dashboard, Plugins > Add New)
It’s best to keep your number of plugins to a minimum and install only the best plugins, because too many plugins can slow down your site.
Plugins I recommend:
- Yoast SEO: An all-in-one SEO solution for WordPress, including on-page content analysis, XML sitemaps and much more.
- WP-Optimize: Clean up your database easily and safely in one click.
- UpdraftPlus: Create backups and restores of your site.
- Shareaholic: Helps you grow your website traffic and engagement.
- All In One WP Security: Top rated security plugin.
- Pretty Links: Makes long and ugly affiliate links look like they’re part of your site.
Don’t forget to hit “Activate” after you installed them, or otherwise they won’t work.
Other WordPress Tips:
1. Login: When you want to login to your WordPress account, always go to WordPress Admin Page.
2. Posts: Posts are what you use to create your blog content. The newest post will be displayed first, unless you state otherwise.
3. Pages: Pages are typically the menus you see on a blog under its title. I recommend an About Me, Contact Me, and Disclosure pages to start with. Make sure they’re easy to find.
4. Categories: Categories are general topics for your site. They are created as a way to group your posts with similar topics together. For example, my post “25 Relaxing Self-Care Ideas for a Bad Day” falls in the Self-Care category. Categories are also displayed on the blog’s menu.
5. Tags: You can also use tags to describe specific details about your post.
6. Plugins: A plugin is a software that contains functions that can extend functionality or add features to your blog.
7. Widgets: Add items to your sidebar, footer, and so on. For example, I currently have social media plugins, search bar, ads, and popular post widgets in my sidebar.
8. Emails: Get started on your email list as soon as you can. I use Convertkit.
9. Stock Photos: To stand out as a blogger, you need your content to be visual and include pictures. Check out 40 Pin-Worthy Free Stock Photo Resources I Use to Grow My Blog for more info.
10. Promotion: You’re going to want to constantly promote your blog posts for your content to be seen. Pinterest is my number one source of traffic by a landslide, because I use Tailwind to schedule all my pins in advance. (If you want to grow your blog tremendously, try this FREE trial of Tailwind).
More Posts to Read:
- 3 Super Simple Ways to Drive More Traffic to Your Small Blog
- 10 Super Easy Ways to Earn Money From Your Blog
- How to Be a Successful Blogger When You Have Social Anxiety
There you have it! You created your own mental health blog on Bluehost!
Did you know that there is online therapy?
Online Therapy is a complete online therapy toolbox.
Your therapy toolbox includes:
- Live video, voice, or text chat session with your therapist
- 8 easy-to-follow sections, including 25 worksheets
- Activity plan, journal, and tests
- Yoga and meditation videos
What I love about Online Therapy is that there are several life-changing options and therapists available, and you don’t even have to leave the comfort of your home.
This means you never need to worry before getting help.
Get 20% off your first month with my exclusive link.


